Water damage is one of the most time-sensitive problems a home or business can face. Unlike many other types of property damage, water does not remain static. It moves, spreads, absorbs, and changes materials rapidly. Because of this, how quickly water damage restoration begins can make a dramatic difference in the severity of damage, overall repair costs, health risks, and how long recovery takes.
Understanding the importance of timing helps property owners respond effectively and avoid long-term consequences. To learn more, contact the expert at All Pro Services today.
Why Time Is the Most Critical Factor in Water Damage
The moment water enters a structure, damage begins. Even clean water from a broken pipe starts soaking into floors, walls, furniture, and structural components almost immediately. Porous materials such as drywall, wood, insulation, and fabric absorb moisture quickly, which weakens their integrity and creates ideal conditions for mold growth.
What makes water damage especially dangerous is that much of it is hidden. While standing water may be visible, moisture often spreads behind walls, under flooring, and into ceilings within minutes or hours. This hidden moisture continues causing damage even after visible water is removed. The longer water remains, the more difficult and expensive restoration becomes.
Because water damage escalates so rapidly, restoration should begin as soon as possible, ideally within the first few hours after the damage occurs.
The First Minutes After Water Damage Occurs
In the initial minutes following a water damage event, water begins spreading outward and downward due to gravity. Floors start absorbing moisture, baseboards wick water upward, and furniture legs draw water into wood fibers. Electrical systems may also be affected if water reaches outlets or wiring.
At this stage, immediate action such as shutting off the water source and ensuring safety can significantly reduce damage. While full restoration may not begin instantly, stopping the flow of water right away is the first critical step in the timeline.
Delays at this early stage allow water to penetrate deeper into materials, increasing the likelihood of structural damage and mold development later.
What Happens Within the First Few Hours
Within the first one to four hours, water continues to spread and materials begin changing physically. Wood swells, laminate flooring starts to separate, and drywall begins to soften. Metal components may start corroding, and adhesives used in flooring and cabinetry weaken.
This is the ideal window for water damage restoration to begin. Fast water extraction and drying during this time can often prevent permanent damage. Many materials that would otherwise need replacement can still be saved if drying begins early enough.
Professional restoration services aim to respond during this window because early intervention dramatically improves outcomes. Every hour that passes without action increases the scope of damage.
The 24 Hour Mark and Escalating Risks
After 24 hours, the risks associated with water damage increase significantly. Moisture that has not been removed continues feeding deterioration and creates ideal conditions for mold growth. Mold spores are naturally present in indoor environments, and when moisture is introduced, they can begin growing quickly.
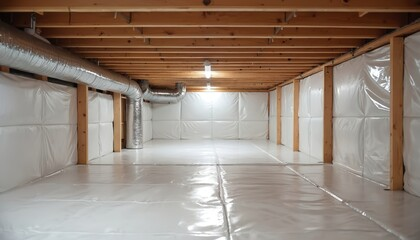
By this point, drywall may need to be removed, flooring may be permanently damaged, and furniture may be unsalvageable. Odors may start developing as bacteria grow in damp areas. The restoration process becomes more complex, involving not just drying but also cleaning, disinfecting, and possibly mold remediation.
Beginning restoration before the 24 hour mark often prevents many of these issues. Waiting beyond this point increases health risks and repair costs.
How Quickly Mold Can Become a Problem
One of the strongest reasons water damage restoration should begin immediately is mold prevention. Mold can begin growing within 24 to 48 hours under the right conditions. Warm temperatures, organic materials, and moisture create an ideal environment for rapid mold development.
Once mold begins growing, restoration becomes more complicated. Affected materials may need to be removed entirely, and specialized containment and cleaning procedures are often required. Mold exposure can also cause health issues, especially for individuals with allergies, asthma, or compromised immune systems.
Early water removal and drying are the most effective ways to prevent mold growth. Starting restoration quickly often eliminates the need for mold remediation altogether.
Structural Damage and Long Term Consequences of Delays
Delaying water damage restoration does not just affect surfaces. Structural components such as framing, subflooring, and support beams can be compromised over time. Prolonged moisture exposure weakens wood, causes warping, and reduces load bearing capacity.
In extreme cases, delayed restoration can lead to sagging floors, cracked walls, or ceiling collapse. These issues are far more expensive to repair than early water extraction and drying. What begins as a manageable restoration project can turn into a major reconstruction effort if time is lost.
Quick restoration protects the integrity of the building and helps preserve its long term value.
Health Risks Increase With Every Delay
Water damage creates health risks that grow with time. Damp environments encourage bacteria, mold, and mildew growth, all of which can negatively affect indoor air quality. Odors caused by microbial growth can linger long after water is removed if not addressed properly.
In cases involving contaminated water such as sewage backups or floodwater, health risks are even higher. Delayed cleanup increases exposure to pathogens and harmful substances that can cause illness.
Beginning restoration quickly reduces these risks and helps maintain a safe living or working environment. Health protection is one of the most important reasons not to delay water damage response.
How Professional Restoration Timelines Work
Professional water damage restoration companies are trained to respond quickly because they understand how time sensitive the process is. Many offer emergency services designed to begin work within hours of a call.
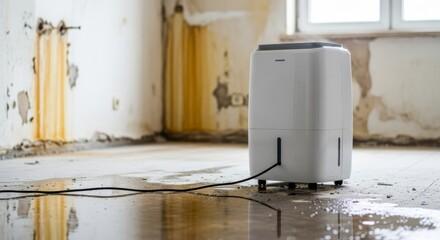
Once on site, professionals assess the damage, extract standing water, and begin drying immediately. Specialized equipment such as industrial pumps, air movers, and dehumidifiers allows them to remove water and moisture far more efficiently than household tools.
This rapid response is designed specifically to minimize damage, prevent mold, and shorten overall recovery time. Professional involvement early in the process often saves both time and money.
Can Water Damage Restoration Ever Wait?
There are very few situations where delaying water damage restoration is advisable. Even minor leaks or small spills can cause hidden damage if ignored. While a small surface spill may seem harmless, moisture can still seep beneath flooring or into walls.
The only time restoration might not begin immediately is when safety conditions make entry dangerous, such as electrical hazards or structural instability. In these cases, securing the area and calling professionals is still the correct immediate action.
In general, the rule is simple. If water has entered the structure, restoration should begin as soon as it is safe to do so.
The Financial Impact of Starting Restoration Late
Cost is a major concern for property owners dealing with water damage. One of the most common misconceptions is that waiting might save money. In reality, delays almost always increase costs.
Early restoration often involves water extraction and drying. Late restoration may involve demolition, mold remediation, material replacement, and structural repairs. Insurance claims may also become more complicated if damage worsens due to delayed action.
Starting restoration quickly helps limit damage and control costs. Many insurance providers also expect prompt action to prevent further loss, making early response financially important.
Insurance Considerations and Timing
Insurance policies typically require policyholders to take reasonable steps to prevent additional damage after a loss occurs. Delaying water damage restoration may affect coverage if it is determined that the damage worsened due to inaction.
Documenting the damage and contacting the insurance provider early helps protect the claim. Professional restoration companies often assist with documentation, moisture readings, and reports that support insurance claims.
Timely restoration aligns with insurance requirements and reduces the risk of claim disputes.
How Homeowners Should Respond Immediately
While professional restoration is essential, homeowners can take basic steps immediately after water damage occurs. These include shutting off the water source, ensuring safety, removing small amounts of standing water if safe, and contacting a restoration professional right away.
Avoiding common mistakes such as using household fans incorrectly, ignoring hidden moisture, or delaying professional help is just as important as taking action. The goal is to stabilize the situation until professionals can take over.
Knowing that restoration should begin quickly helps homeowners act with urgency rather than uncertainty.
The Ideal Timeline for Water Damage Restoration
Ideally, water damage restoration should begin within the first few hours after water intrusion occurs. This timeline offers the best chance of minimizing damage, preventing mold, protecting health, and reducing repair costs.
While restoration can still be successful after delays, outcomes are generally better the sooner work begins. Every hour matters, especially during the first day.
Understanding this timeline empowers property owners to respond effectively during a stressful situation.
Final Thoughts on How Quickly Water Damage Restoration Should Begin
Water damage restoration should begin as soon as possible after water intrusion is discovered. Time is the most important factor influencing the extent of damage, cost of repairs, health risks, and overall recovery time. From the first minutes to the first 24 hours, every delay allows water to cause more harm.
Quick action protects property, preserves structural integrity, and prevents mold growth. It also simplifies the restoration process and supports smoother insurance claims. Whether dealing with a small leak or a major flood, the principle remains the same. The faster restoration begins, the better the outcome.
Being prepared and understanding the urgency of water damage response helps homeowners and property managers act decisively. When water damage occurs, starting restoration immediately is not just recommended, it is essential.